Spatializer for Music
Inputs, processing stages, controls, movement design, effects and export targets for music.
Spatializer for Music turns a stereo master or a set of stems into an immersive mix. It places every source in three dimensions, designs movement around the structure of the song and exports the result in the formats your destination requires, from binaural headphone files to speaker layouts, Ambisonics and Eclipsa Audio.
This page describes the inputs the spatializer accepts, the processing stages it runs, the controls you use to review and refine a mix, the movement and effects tools, and the export targets. The hands-on controls are described as they appear in the Immersive Classroom, where you can try every tool on the free Echoes reference session before you work on your own music.
Inputs
You can start from either of two inputs.
| Input | When to use it | What happens |
|---|---|---|
| Stereo master | You only have the finished mix | Spatial9 analyzes the track and estimates individual stems such as vocals, drums, bass and other instruments |
| Stems | You have the multitrack session | Each stem is placed and moved as its own source, which gives the most control |
Supply clean, lossless files whenever you can. Stems should start at the same point and run for the same length so that they stay aligned. See the Quickstart for preparation steps and Stereo vs stems for help choosing an input.
Processing stages
A track passes through the same stages whether you work in the app, through an AI assistant or through the API.
| Stage | What happens | Your role |
|---|---|---|
| 1. Input | You provide a stereo master or a set of stems | Choose the input type |
| 2. Analysis and separation | The material is analyzed, and stems are estimated if needed | Supply clean, lossless sources |
| 3. GravityLLM arrangement | Azimuth, elevation, distance and movement are generated per source | Provide a clear brief |
| 4. Rendering | AI agents coordinate processing and rendering | None |
| 5. Quality listening | You review the result | Listen and write revision notes |
| 6. Delivery | Files are exported in the formats you select | Choose formats per destination |
GravityLLM is the Spatial9 AI model that decides where each source sits. See Spatial inference and GravityLLM for how it makes those decisions.
What the engine does automatically
The music engine responds to the structure and content of the song rather than applying one effect to the whole track. The following capabilities run without manual automation.
- Base placement. Every stem receives a position in 3D. The lead vocal, kick and bass stay anchored by default, so the song keeps its center while the space around it moves.
- Movement design. Motion is drawn from more than 1,500 movements built on more than 110 core shapes in 20 families, beat-synced with a per-stem phase.
- Section-aware staging. Nine section profiles, from intro to outro, give each part of the song its own field size and height.
- Harmonic motion. Key, mode and chord estimation is mapped to subtle spatial behaviors such as field breathing and key-change warps.
- Lyric choreography. Word-level transcription, 154 built-in words and phrases and 22 spatial actions propose spatial gestures on chosen words, each open to your approval.
- Immersive effects. The engine draws on 61 effects in nine families, six of them spatially aware versions of traditional tools.
- Frequency-aware placement. Per-stem filtering keeps low-frequency weight stable while upper ranges carry direction.
The workspace
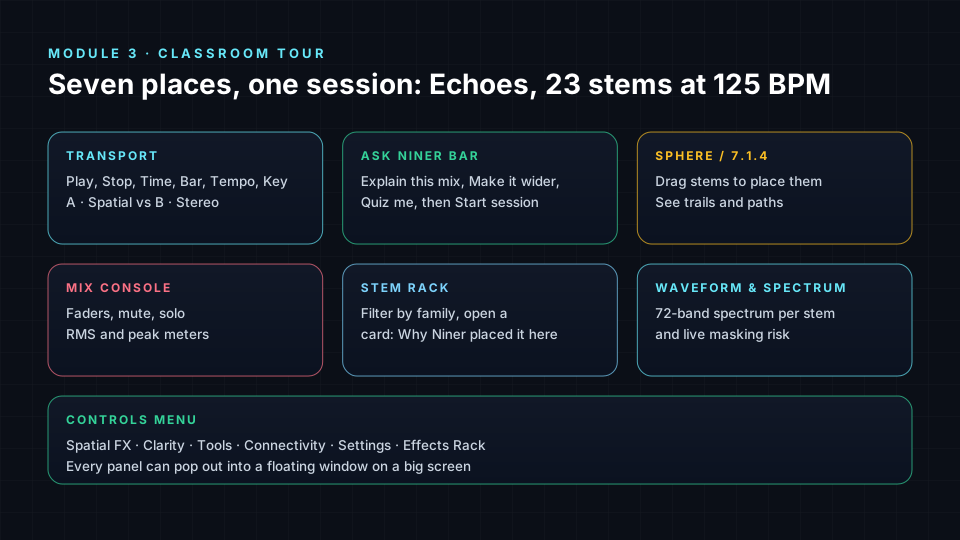
The Immersive Classroom workspace is organized around seven areas: the transport, the Ask Niner bar, the Sphere and 7.1.4 view, the mix console, the stem rack, the waveform and spectrum panel, and the Controls menu.
Transport and A/B comparison
The transport provides Return to start, Play/Pause and Stop, with readouts for time, bar and beat (in 4/4), tempo, key and render mode. With the position bar focused, the left and right arrow keys jump five seconds.
The A/B switch is the most important review control. A · Spatial plays the immersive mix and B · Stereo plays the original stereo mix of the same song. Use it whenever you are unsure whether a spatial choice helps.
Panels
The workspace has four main panels:
- Sphere / 7.1.4 view to see and place every sound in 3D.
- Mix console for faders, mute, solo and meters for stems and speaker channels.
- Stems for the stem rack, with one tile per stem.
- Waveform & spectrum for the song overview and a live frequency analyzer.
On a screen at least 1,024 pixels wide, each panel can pop out into a floating window.
The Controls menu
The Controls panel groups the mix tools into five sections.
| Group | Tools |
|---|---|
| Spatial FX | FX Energy, Accent Throws, Ghost Orbits, Flux Mode |
| Clarity | Frequency Masking, Auto Ducking |
| Tools | Harmonics, A/B/C Compare |
| Connectivity | LiveLink to a DAW over MIDI, Collab sessions (beta) with a room code |
| Settings | Head Tracking, Spatial Mix or Original playback, Hearing Compensation, Parametric EQ, Master, Performance, headphone profile |
The same panel opens the Effects Rack. The Ask Niner bar provides a conversational tutor; see Education and Academy.
Placing sources
Every position is described by three numbers.
| Number | Meaning | Range |
|---|---|---|
| Azimuth | The angle around you: 0° is ahead, +90° is right, -90° is left, 180° is behind | Full circle |
| Elevation | The angle above or below your ears: +90° is directly overhead | -40° to +90° |
| Distance | How far the sound is from your head | 0.5 to 8 meters |
The Spatial Sphere
The Sphere is the listener's view of the scene. Drag a stem to change its azimuth and elevation; dragging keeps its distance, because distance changes loudness, tone and reverb balance at once and should be a separate decision. When you move one side of a stereo pair, the other side mirrors it.
Select a stem to open the inspector. Quick place buttons jump to standard positions such as Front, Wide L (-30°), Above (70° elevation) and Rear R (+135°), and the arrow keys nudge the stem by 5°. The Top and Side camera views reveal problems that the 3D view can hide.
The 7.1.4 Studio
The 7.1.4 Studio is the engineer's view: a virtual room with seven ear-level speakers, one LFE and four ceiling speakers. Floor speakers sit 3.5 m from the listener at 1.2 m height, at 0° (C), ±30° (L, R), ±90° (Ls, Rs) and ±145° (Lrs, Rrs). Ceiling speakers sit at ±45° in front (Ltf, Rtf) and ±135° behind (Ltr, Rtr). Drag to move a stem, and Shift-drag to change its height.
The studio pans with 3D VBAP (vector base amplitude panning). Each object is shared across the three nearest speakers that surround its direction at constant power, so its level stays the same as it moves. A sound directly overhead feeds all four ceiling speakers equally, and anything below ear level folds onto the floor speakers. Turn on Routing to see which speakers each object feeds, and read the per-channel Speaker output meters in dBFS.
Movement design
Movement is the most powerful tool in an immersive mix and the easiest to overuse. Before you move a sound, answer three questions:
- What is the musical reason? A riser builds tension, so rising motion supports it. If you cannot name a reason, keep the sound still.
- What stays still? Motion is readable only against stable anchors, usually bass, lead and the main drums.
- Where will the listener look? Motion behind the listener pulls attention away from the front stage, so reserve it for short moments.
The Movement Library
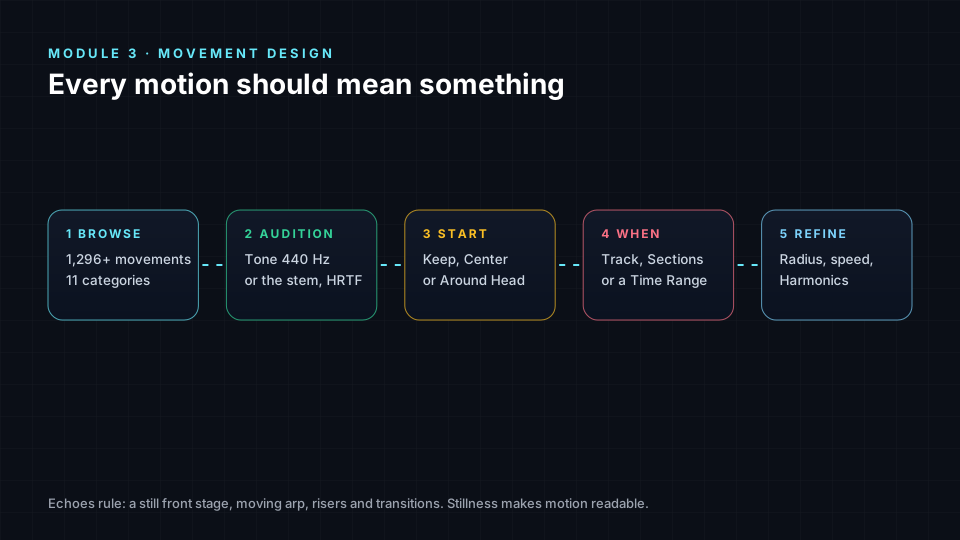
Open a stem card and select Movement, or use Change movement in the Sphere inspector. The classroom Movement Library offers more than 1,296 movements in eleven categories: Orbital, Linear, Dynamic, 3D Complex, Static, Immersive, Ambient, Cinematic, Intimate, Spatial FX and Your Custom. Search by name, effect or use case, for example "slow overhead" or "tension".
Audition every movement with Tone (a 440 Hz test tone) to judge the path, then with Stem to judge whether it suits the sound. Both are rendered in 3D with HRTF. Press Space to audition and Enter to select.
Applying a movement
The Apply Movement dialog asks where the movement starts and when it runs.
| Starting position | Effect |
|---|---|
| Keep Position | Starts from the stem's current position; the path may be constrained to stay in the room |
| Center First | Re-centers the stem so the full movement is visible |
| Around Head | Orbits around the listener |
You can apply the movement to the Entire Track, to Specific Sections or to a Custom Time Range. Section and range scopes reserve motion for the moments that need it, such as a build or a breakdown. After a stem moves, adjust its orbit radius and speed on the stem card.
To fix a stem in place instead, use Set Position, which accepts the same scopes.
Sections and harmonic motion
Check the song's sections in the Arrangement timeline, and correct them with Edit Sections, before you apply section-based movement.
Harmonics in the Tools group ties motion to the music. Melodic instruments move vertically with pitch, so a rising melody rises. Controls include Orbit Radius, Activity, Speed, Height and Smoothness, with toggles for Pitch Tracking, Energy Reactive, Breathing Effect and Section Aware. You can apply harmonic motion to melodic instruments, backing vocals, bass and synthesizers.
After a movement pass, use A/B/C Compare to switch between the spatial stems, the reference master and the generated mixdown, and confirm that the motion still serves the song.
Balance and clarity
The Mix Console has a Stems tab with one strip per stem and a 7.1.4 Channels tab with twelve channel strips, one per speaker. Stem faders run from -60 dB to +6 dB, while channel and Master faders stop at 0 dB. Double-click a fader to return it to 0 dB, use the arrow keys for 1 dB steps and Shift with an arrow for 0.1 dB steps. Unity resets every stem volume at once.
Meters show RMS and peak level from -60 to 0 dBFS. Peaks are held for 1.6 seconds, and the clip light turns on at -0.1 dBFS or above. The console has no LUFS meter, so judge overall loudness by ear and with the A/B switch, and apply loudness targets in your delivery tools.
The frequency spectrum draws a curve for every stem and for the mix total across 20 Hz to 20 kHz. Turn on Frequency Masking to find clashing sounds. The masking risk for a pair of stems is spectral overlap multiplied by spatial closeness, so moving clashing stems apart on the Sphere reduces it. Auto Ducking lowers other stems while the vocal is active, by up to 12 dB in 0.5 dB steps; two to four decibels is often enough.
The Effects Rack
The Effects Rack holds 1,459 effects in 16 collections. Apply to selects the whole mix or any single stem, and each stem keeps its own chain. A chain has up to eight slots, and sound flows from top to bottom. Each slot provides bypass, parameters, reordering, removal and a 0 to 100% dry/wet Mix control.
| Collection | Effects | Purpose |
|---|---|---|
| Immersive 7.1.4 | 236 | Reverbs and space designed for the 12-speaker room |
| NASA Sonification | 45 | Textures inspired by sonified space data |
| Mind Tricks | 112 | Psychoacoustic illusions of width, distance and motion |
| Sound Hacks | 274 | Synthesis and voice techniques from classic research |
| Time Benders | 147 | Granular and time-stretch effects |
| Academic Lab | 255 | Landmark reverb and hearing-model designs |
| Signature | 14 | Complete named looks |
| Classic collections | 376 | Reverb and space, delay, modulation, pitch, rhythm, texture and glitch, distortion, dynamics, EQ and filter |
Immersive 7.1.4 reverbs use ten decorrelated tails, one for each surround and height speaker, so the room sounds wide rather than like one reverb copied to every channel. Every effect is built from a set of 28 processors, and tempo-synced effects follow the session tempo.
Preview an effect before you add it. The Preview player plays it on the selected stem, on the mix or on a neutral beep, and crossfades between Dry (A) and Effect (B).
Export targets
Exports include effects by default, for both the whole-mix chain and each stem chain, so what you hear is what you deliver.
| Target | Description |
|---|---|
| Binaural | Two channels for headphones; the primary format for most listeners |
| Stereo Mixdown | Two channels for speakers or headphones where 3D is not supported |
| Speaker files | Channel layouts from 3.1 up to 9.1.6, including a 10-channel 5.1.4 WAV |
| Auro 3D | Layered output for Auro-3D playback systems |
| Ambisonics | Orders 1 to 4, with 4, 9, 16 and 25 channels |
| YouTube Eclipsa Audio video | Attach the mix to an MP4, MOV or WebM video and render an IAMF MP4 |
| All package | Every format at once in a single downloadable archive |
On paid music plans, the export presets also include ADM BWF, ADM XML and Eclipsa Audio, and Music Studio adds IAMF and MPEG-H. Format availability depends on your plan; see the pricing page for the current list.
Choose a primary format for most of your audience and a safety format, usually the Stereo Mixdown, for everyone else. See Formats overview for help matching formats to destinations.
Next steps
- Mixing best practices: apply proven placement and movement habits to your own sessions.
- Exporting stems: prepare stems from your DAW so the spatializer receives clean, aligned sources.
- Formats overview: choose the right deliverable for each destination.
- Spatializer for Video: learn how the same engine places sound to follow the picture.