Classroom Lab 1: Place Sound on the Sphere and in a 7.1.4 Studio
Spatial9 Team · · 7 min read
Lab 9 of 24 in Spatial9 Academy, module 3: Inside the Immersive Classroom. Practice in the demo: Music Transformation.
Key takeaways
- Every position is three numbers: azimuth around you, elevation above or below your ears, and distance from 0.5 to 8 metres.
- On the Sphere, dragging changes direction but keeps distance, Quick place jumps to standard spots, and arrow keys nudge by 5 degrees.
- A 7.1.4 room has seven ear-level speakers, one LFE and four ceiling speakers; the classroom places floor speakers 3.5 m away at 1.2 m height.
- 3D VBAP shares each object across the three nearest speakers at constant power, and a sound straight overhead feeds all four ceiling speakers equally.
Placement is the first decision in any immersive mix. Before effects, before movement, before automation, you decide where each sound lives. A good placement makes a mix feel clear and inevitable. A poor one makes even great sounds feel lost.
In the classroom tour you met the two views that show your scene: the Sphere and the 7.1.4 Studio. They show the same scene in two ways. The Sphere is the listener's view: directions around your head. The 7.1.4 Studio is the engineer's view: a real room with twelve speakers. In this lab you will use both.
What you will learn
- How azimuth, elevation and distance describe any position.
- How to drag, nudge and quick-place a stem on the Sphere.
- How the Trails, Paths and Orbit layers help you read motion.
- The layout of a 7.1.4 room and the job of each speaker.
- How 3D VBAP shares a sound across the three nearest speakers.
- How to read the Routing view and the speaker output meters.
Three numbers for every position
Every position in the classroom is described by three numbers:
| Number | Meaning | Range in the classroom |
|---|---|---|
| Azimuth | The angle around you. 0° is straight ahead, +90° is right, -90° is left, 180° is behind | Full circle |
| Elevation | The angle above or below your ears. +90° is directly overhead | Floor of -40° up to +90° |
| Distance | How far the sound is from your head | 0.5 to 8 metres |
Hover over any stem on the Sphere and you will see these values in a small readout, for example "+30° az · +10° el · 2.0 m". Learn to say positions out loud this way. "The lead is at zero azimuth, plus ten elevation, two metres" is a note any engineer can act on.
Part 1: The Spatial Sphere
Switch the view toggle to Sphere. The header shows "Spatial Sphere" and how many objects are in the scene. Guide labels mark Front 0°, Right 90°, Rear 180°, Left -90° and Above +90°. The hint line tells you the three basic moves: "Drag a stem to place it · Drag space to rotate · Scroll to zoom".
Dragging keeps distance
When you drag a stem, the classroom keeps its distance and changes only its azimuth and elevation. This is deliberate. Distance changes loudness, tone and reverb balance all at once, so it should be a separate, careful decision. Elevation stops at -40°, because sounds far below the ears are hard to perceive on headphones and rarely help a music mix.
Stereo stems are pairs. When you move one side of a left/right pair, the other side mirrors it, so the image stays balanced. Double-click empty space to reset the camera if you get lost.
Layers and camera views
Three layers help you read motion:
- Trails show where each stem has been.
- Paths show where moving stems will go next.
- Orbit slowly rotates the camera so you see depth.
Camera buttons give you 3D, Top, Front and Side views, plus Reset view. Use Top to judge left-right and front-back, and Side to judge height. A placement that looks good in 3D can hide a problem that Side reveals immediately.
The inspector and precise moves
Click a stem to select it. The inspector shows Azimuth, Elevation and Distance. Below them you get Quick place buttons:
| Quick place | Azimuth | Elevation |
|---|---|---|
| Front | 0° | 0° |
| Wide L | -30° | 0° |
| Wide R | +30° | 0° |
| Above | 0° | 70° |
| Left | -90° | 0° |
| Right | +90° | 0° |
| Rear L | -135° | 0° |
| Rear R | +135° | 0° |
Sliders give you Distance from 0.5 to 8 m and Height from -40° to 90°. With a stem selected, the arrow keys nudge it: left and right change azimuth by 5°, up and down change elevation by 5°, and Esc deselects. The inspector also has Change movement, By section and Channel buttons. If the stem already moves, you will see "Its movement now orbits from the new spot", which means the motion is kept and simply re-centred.
Part 2: The 7.1.4 Studio
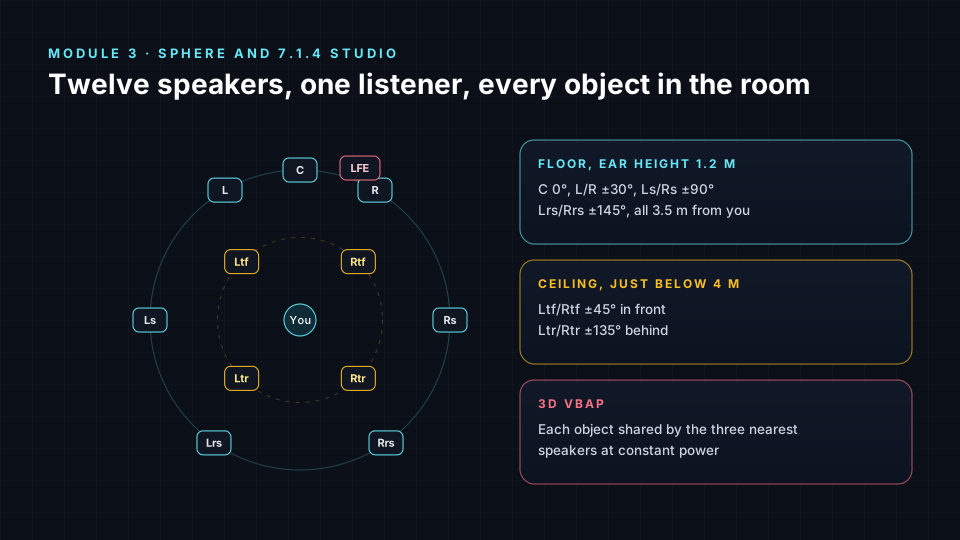
Switch the toggle to 7.1.4 Studio. The header reads "7.1.4 Renderer". You are now standing in a virtual room with twelve speakers.
The speaker layout
- Floor, at ear height of 1.2 m and 3.5 m away: C at 0°, L and R at ±30°, Ls and Rs at ±90°, Lrs and Rrs at ±145°.
- LFE: the subwoofer channel for low frequencies.
- Ceiling, just below a 4 m ceiling: Ltf and Rtf at ±45° in front, Ltr and Rtr at ±135° behind.
The name 7.1.4 counts them: seven ear-level speakers, one LFE and four height speakers. The hint line reads "Drag a stem to move it · Shift + drag changes height". Views are Perspective, Top, Front and Side. Stems always stay inside the room.
How 3D VBAP works
The classroom uses 3D VBAP (vector base amplitude panning). For every object, it finds the three nearest speakers that surround that direction and shares the signal among them at constant power. Constant power means the sound does not get louder or quieter as it moves between speakers; only its direction changes.
Two details are worth knowing. First, a virtual speaker directly overhead feeds all four ceiling speakers equally, so a sound placed straight above you is spread evenly across the ceiling instead of jumping to one corner. Second, anything placed below ear level folds onto the floor speakers, because there are no speakers under the floor. The LFE takes the low-frequency share, using a 120 Hz crossover in the meters.
Routing and speaker meters
Turn on Routing to see lines from each object to the speakers it is panned to. This makes VBAP visible. Move the Synth Lead slightly right of centre and you will see it shared between C and R. Lift it and you will see Ltf and Rtf join in.
The Speaker output meters show the level of each channel in dBFS, grouped as L R C LFE, then Ls Rs Lrs Rrs, then Ltf Rtf Ltr Rtr. If the ceiling meters barely move, your scene has little height. If one rear speaker is always loudest, something may be pulling attention behind the listener.
Lab steps
- In the Sphere, select Pluck 3. Note its azimuth, elevation and distance.
- Press Quick place → Above. Listen for 30 seconds, then put it back with the arrow keys.
- Select Synth Lead. Use Side view and raise it to +20°. A/B against +5°. Which keeps the lead clearer?
- Move Honk from rear left to Wide L. Does the front stage feel crowded? Move it back.
- Switch to 7.1.4 Studio and turn on Routing. Drag Atmosphere directly overhead. Confirm all four ceiling speakers light up equally.
- Shift-drag Impact 3 below ear level and watch it fold onto the floor speakers.
- Watch the Speaker output meters during the chorus. Write down the three busiest channels.
Check yourself
- What are the three numbers that describe any position?
- Why does dragging on the Sphere keep distance fixed?
- How many speakers does 3D VBAP use for one object?
- What happens to a sound placed directly overhead in the 7.1.4 Studio?
- What does "constant power" protect you from?
Answers
- Azimuth, elevation and distance.
- Because distance changes level, tone and reverb together, so it deserves its own deliberate decision.
- The three nearest speakers surrounding its direction.
- A virtual overhead speaker feeds all four ceiling speakers equally.
- Level jumps as a sound moves between speakers.
Assignment
Write a placement plan for six Echoes stems of your choice. For each, give azimuth, elevation and distance, the speakers it uses in the 7.1.4 Studio, and one sentence of reasoning. Then ask Niner why it placed two of those stems where it did, and record whether its answer changed your mind.
Frequently asked questions
What is the difference between the Sphere and the 7.1.4 Studio?
The Sphere shows directions around the listener's head, while the 7.1.4 Studio shows the same scene in a room with twelve speakers so you can see which speakers each sound uses.
What is 3D VBAP?
3D vector base amplitude panning shares each sound among the three nearest speakers around its direction at constant power, so it moves smoothly without jumps in loudness.
Why can I not place a sound far below me?
Elevation stops at -40° because sounds well below ear level are hard to hear accurately on headphones, and in a speaker room they fold onto the floor speakers anyway.
Do I need real speakers for this lab?
No, headphones are enough, because the classroom renders the 7.1.4 room binaurally and shows the routing and speaker meters on screen.
Next step
Placement decides where a sound lives. Level decides how much space it takes. Continue with Mix Console, Meters and Clarity, or return to the Spatial9 Academy course home.
The full lesson is free with a Spatial9 account.