Lab 3: Your First Immersive Mix From Your Own Stems, Exported to Binaural
Spatial9 Team ·
Lab 10 of 14 in Spatial9 Academy, module 3: Hands-on labs. Practice in the demo: Music Transformation.
This is the moment the course has been building toward. Until now you have listened to someone else's music in someone else's space. Today the music is yours.
Somewhere on your drive there is a track you care about. A beat you made at two in the morning. A band recording from last semester. A score cue for a friend's short film. By the end of this lab, that music will live all around the listener, and you will have a file you can send to anyone with a pair of headphones.
You already have everything you need. Lab 1 gave you a listening method. Lab 2 showed you that space is something you can shape. Now you bring your own stems, GravityLLM proposes a spatial arrangement, and you do what professionals do: brief, judge, listen, revise and approve.
What you will learn
- How to prepare stems so an AI spatial engine can work with them cleanly.
- How to write a one-paragraph creative brief that guides your decisions.
- How to upload in "Your Stems + AI" and review the result in the stage player.
- How to iterate with purpose and export your mix as binaural.
- How to test on several headphones and earbuds and document your decisions for a portfolio.
Before you start: access and rights
The Spatial9 Student plan costs $9 and includes access to the demo environment and binaural exports. Sign up at app.spatial9.ai and choose the Student plan.
Then choose music you have the rights to use. The safest choice is music you wrote and recorded yourself, or a project where every contributor has agreed. Do not upload commercial releases or other people's stems without permission. If you are working with AI-generated music, check the terms of the tool you used, and read our guide to taking AI music to spatial audio.
Prepare your stems like a professional
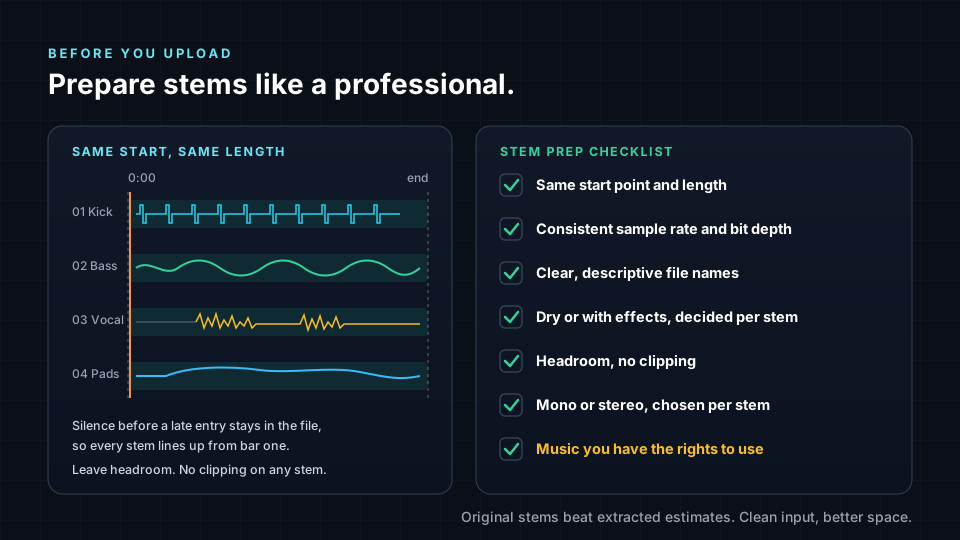
GravityLLM can only work with what you give it. Clean, consistent stems give it clear information about each part of your music. Messy stems create problems that no model can fully fix. You also know from Inside the Spatial9 Pipeline that stems extracted from a stereo master are estimates. Original stems from your session are better, so use them whenever you can.
Same start point and same length
Export every stem from the same start point, usually the very beginning of the song, and to the same end point. If a vocal enters in bar 17, the file still starts at bar 1 with silence before the vocal. This keeps every part in time when the stems are combined. Trimming the silence is one of the most common mistakes, and it breaks the timing.
Consistent sample rate and bit depth
Every stem should share one sample rate and one bit depth. For example, 48 kHz and 24-bit are common choices in music and video production. Whatever you choose, keep every file the same, and match the rate of your original session so nothing is converted unexpectedly.
Clear names
Name files so anyone can understand them. A number and an instrument works well: "01-Kick", "02-Bass", "03-LeadVocal", "04-Pads". Avoid names like "Audio 7" or "final-final2". Clear names help you during review, and they make your project readable for collaborators.
Dry or with effects
Decide, stem by stem, whether to keep effects. Reverb and delay printed into a stem carry their own stereo space, and that space travels with the sound wherever it is placed. Drier stems give the spatial arrangement more freedom. Effects that are part of the character of a sound, such as distortion on a guitar or a filter on a synth, usually belong in the stem. Whatever you decide, write it down.
Headroom and no clipping
Make sure no stem clips. Leave headroom so the peaks stay comfortably below full scale. Bypass any limiter or heavy compression on your master bus when you export, so the stems are not shaped by processing meant for the full stereo mix.
Mono or stereo
Choose per stem. A source that is naturally a point, such as a lead vocal, kick or bass, often works best as a mono stem, because it can be placed as one clear point in space. A source that is genuinely wide, such as a stereo pad or a pair of room microphones, can stay stereo. Avoid exporting a mono sound as a fake stereo file with two identical channels.
For a deeper guide, read Best Practices on Exporting Audio Stems.
Write a one-paragraph creative brief
A brief is your promise to yourself and to your listener. It says what the mix should feel like before you hear what the AI proposes. Without it, you will tend to accept whatever sounds impressive. With it, you can judge whether the result serves the song.
Keep it to one paragraph. Name the genre, the mood, where the listener should feel they are, and what must stay focused. Here is an example.
Notice that the brief uses the vocabulary from Lab 1: position, width, height, distance, envelopment and clarity. That makes it easy to check the result against it.
The lab flow
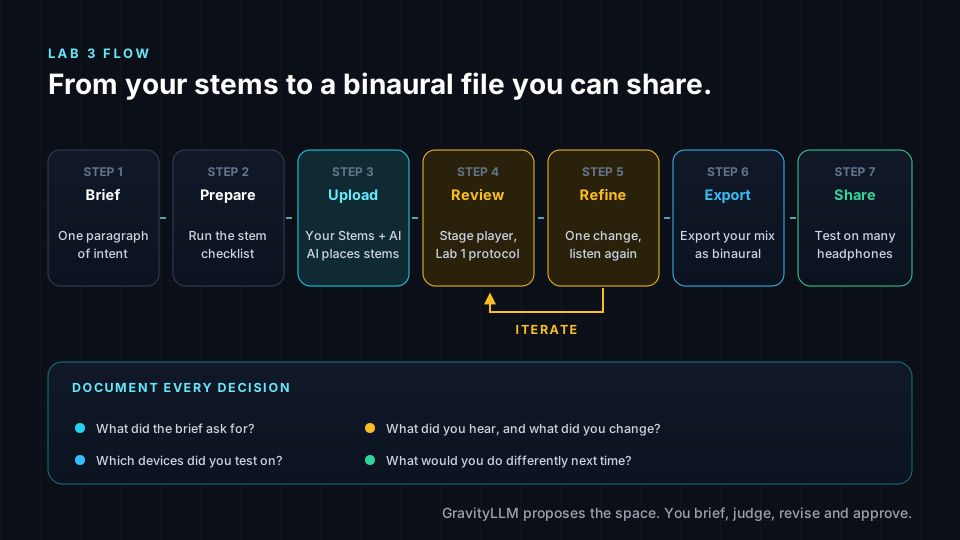
Here is the whole journey at a glance. The loop between review and refine is where your skill as an engineer really shows.
Upload and let GravityLLM propose
In the music demo, the mode "Your Stems + AI" lets you upload your stems. GravityLLM then positions them in 3D space based on genre. When processing is done, you review the result in a stage player. Depending on your account, a usage quota notice may appear. Treat your uploads as valuable, and make sure your stems are ready before you send them.
Review with the Lab 1 protocol
Do not judge on a single listen. Use the passes from Lab 1 that the stage player allows. Listen to the whole mix with your eyes closed. Focus on one part at a time. Draw a listening map. Then compare the result with your brief, line by line.
Ask concrete questions. Is the lead vocal where the brief says it should be? Is anything masking it? Does the chorus open wider than the verse? Does anything move in a way that distracts from the song?
Refine with purpose
When something does not match the brief, find the cause before you change anything. Most fixes happen at the stem level. A vocal smeared by printed reverb may need a drier export. A crowded stem that holds both guitars and keys may work better split in two. A clipped stem needs more headroom.
Change one thing at a time, upload again, and listen again with the same protocol and level. Write down what you changed and what you heard. This is the review and refine loop, and it is exactly how professional immersive work happens.
Export as binaural and test widely
When the mix meets your brief, export your mix as binaural. A binaural file is a normal two-channel file that carries 3D cues, so it plays on any headphones without special hardware. Learn more in 8D vs Binaural vs Spatial Audio.
Then test it on several devices: your studio headphones, a pair of everyday earbuds, and if you can, a friend's headphones. Headphones differ in tone and in how they present space, and your listeners will use all kinds. Note anything that changes a lot between devices, such as a vocal that drifts or a bass that disappears on earbuds.
Share and document
Share your file with a few listeners and ask them to describe where they hear things, using the Lab 1 vocabulary. Compare their answers with your own map. When you want to go further, read where to publish spatial audio.
Lab steps
Wear headphones throughout. The Music demo has the status Live.
- Sign up at app.spatial9.ai and choose the Student plan.
- Choose a song you have the rights to use. Write your one-paragraph creative brief before you export anything.
- In your DAW, export your stems from the same start point to the same end point, with one sample rate and bit depth, clear names, decided effects, no clipping and a deliberate mono or stereo choice for each stem.
- Spot-check your stems. Import them into a fresh session at the same start point and play them together. They should line up and sum to something close to your original mix.
- Open /demo/music. Under "Choose a mode", select the tile "Your Stems + AI" and upload your stems.
- When the stage player appears, set a comfortable, moderate level and keep it there. Listen to the whole track once with your eyes closed.
- Listen again with one focus per pass, using the Lab 1 protocol and worksheet. Draw a listening map and compare it with your brief.
- List up to three differences between the result and your brief. For each one, decide on a single stem-level change.
- Make your changes, upload again and review again at the same level. Repeat until the mix serves the brief.
- Export your mix as binaural.
- Play the binaural file on at least three devices, including at least one pair of earbuds. Note what changes.
- Write up your decisions while they are fresh.
Key terms
| Term | Meaning |
|---|---|
| Stem | An audio file holding one instrument or group, exported from the same start point as the others. |
| Sample rate | How many times per second the audio is measured, such as 48 kHz. |
| Bit depth | How precisely each sample is stored, such as 24-bit. |
| Headroom | The space between your loudest peak and full scale, which prevents clipping. |
| Clipping | Distortion caused when a signal exceeds the maximum level a file can store. |
| Creative brief | A short statement of intent that guides and checks your mix decisions. |
| Stage player | The review player in "Your Stems + AI" where you hear GravityLLM's spatial arrangement. |
| Binaural export | A two-channel file carrying 3D cues for playback on any headphones. |
Check your understanding
- Why should every stem start at the same point, even when a part enters late?
- When might you keep a stem dry, and when might you keep its effects?
- What is the purpose of writing a creative brief before you upload?
- Why should you change only one thing between review passes?
- Why test your binaural export on several headphones and earbuds?
Answers
- So that every part stays in time when the stems are combined, because trimmed silence shifts a part out of position.
- Keep it dry when you want the spatial arrangement to have full freedom, and keep effects that are part of the sound's character, such as distortion.
- It defines what success sounds like, so you judge the result against your intent rather than accepting whatever sounds impressive.
- So you know which change caused which difference, and can undo it if it made things worse.
- Devices differ in tone and in how they present space, and your listeners will use many different ones.
Assignment
Build a "first immersive mix" case study for your portfolio. Include your creative brief, a list of your stems with names, sample rate, bit depth, mono or stereo and effects decisions, your listening maps from the first and final review, a short log of each revision with what you changed and why, and notes from testing on at least three devices. Attach the final binaural file. Close with one paragraph on what GravityLLM proposed that surprised you, and one paragraph on the decision you are proudest of.
Frequently asked questions
Can I use a stereo mix instead of stems?
Spatial9 can work from stereo music by estimating stems, but extracted stems are estimates, so for this lab use original stems from your own session whenever you can, because they give cleaner and more controllable results.
What does the Student plan include?
The Student plan costs $9 and includes access to the demo environment and binaural exports, and you can sign up at app.spatial9.ai.
Why does my mix sound different on earbuds than on my studio headphones?
Headphones and earbuds differ in frequency response, fit and how they present space, so testing on several devices helps you find a mix that holds up for every listener.
How many revisions should I make?
There is no fixed number, so keep revising until the mix matches your brief, while changing one thing at a time and documenting each change so your process is clear.
Next step
You have made your first immersive mix from your own music. Congratulations, that is a real milestone. In the next lesson, Sound for Picture: How AI Makes Video Audio Immersive, you will take spatial thinking from music to film and video. You can always return to the Spatial9 Academy course home to see the full path.