DaVinci Resolve to Eclipsa Audio: The Immersive YouTube Workflow
Spatial9 Team · · 8 min read
Key takeaways
- Fairlight mixes Dolby Atmos and Ambisonics (up to fifth order) on immersive buses, but these 3D workflows require DaVinci Resolve Studio.
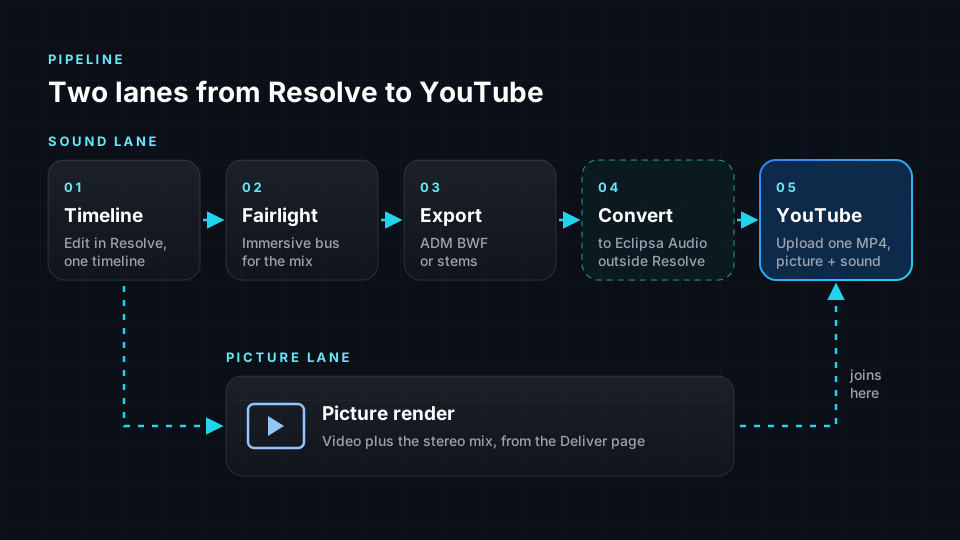
- We found no native IAMF or Eclipsa Audio export in Blackmagic's current documentation, so the Eclipsa step happens after you leave Resolve.
- From an Atmos bus, export a Dolby Atmos ADM BWF via Fairlight > Immersive Audio > Export Master or the Deliver page, then convert it with the free ADM to Eclipsa converter.
- An Ambisonics bus renders to a multichannel WAV that needs an IAMF encoder; stereo or 5.1 projects can export stems for Spatializer for Video, now in early access.
- YouTube recommends an MP4 with Stereo + Eclipsa Audio at 48 kHz, no edit lists, the moov atom at the front and 128 kbps per channel for Eclipsa Audio.
- Check the ADM master and the final MP4 in the free in-browser file checker before you convert or upload.
Many video editors already finish their sound in Fairlight, the audio page built into DaVinci Resolve. Fairlight can mix in 3D, and YouTube accepts Eclipsa Audio uploads, but no single button links the two. This guide explains the full route, the export choices along the way, and where each tool fits.
What Fairlight can do with immersive audio today
Blackmagic says the Fairlight page can output "mono and stereo to immersive 5.1, 7.1, 22.2 and even the latest 3D audio formats" from the same project. The important details for this workflow:
- 3D formats need Resolve Studio. The free version mixes stereo and surround. Blackmagic's training guide states that the Ambisonics and Dolby Atmos workflows require DaVinci Resolve Studio.
- Supported 3D formats. The DaVinci Resolve 20 Fairlight training guide lists MPEG-H, Auro 3D, Sony 360 Reality Audio, Ambisonics and Dolby Atmos. The current Fairlight product page also names ASAF (Apple Spatial Audio Format, added in 20.1) and Audio Vivid.
- Ambisonics up to fifth order. Resolve 20 Studio offers ambisonic buses up to fifth order, which is 36 channels.
- Binaural monitoring. You can switch the monitoring format between 7.1.4, 2.0 and Binaural during playback, which is useful when you mix on headphones.
- Resolve 21 is the current major version. Its Fairlight additions are track folders, a 6-band clip EQ, EQ and level matching and Chain FX, plus wider VR180 and VR360 support for picture. Its feature page does not mention IAMF or Eclipsa Audio.
Step 1: set up the immersive bus
Immersive work in Fairlight starts in two places:
- Enable the format. In DaVinci Resolve > Preferences > Video and Audio I/O, the Immersive Audio section lets you enable Ambisonics, Dolby Atmos and the other formats.
- Create the buses. Choose Fairlight > Bus Format, add a bus and set its format, for example Dolby Atmos 7.1.4 or Ambisonics 3rd order.
Then open the 3D panner on a track (Option-double-click the pan area in the mixer, according to Blackmagic) and place sounds in space.
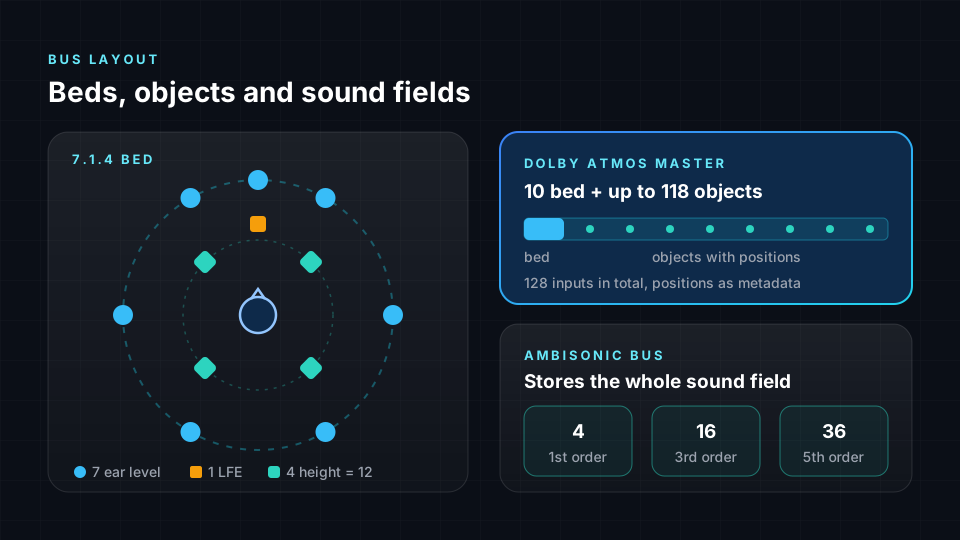
| Bus type | What it holds | Channels | Best for |
|---|---|---|---|
| Stereo | Left and right | 2 | The compatibility mix every upload needs |
| Dolby Atmos | A bed plus objects with pan metadata | Up to 128 in the master; beds use the first 10 | Film-style mixes with moving sounds |
| Ambisonics | A full-sphere sound field | 4 (1st order), 16 (3rd), 36 (5th) | Ambience, 360 video, sound fields |
Keep dialogue in the bed at the front: the screen is the anchor, and only effects that follow the picture need to fly.
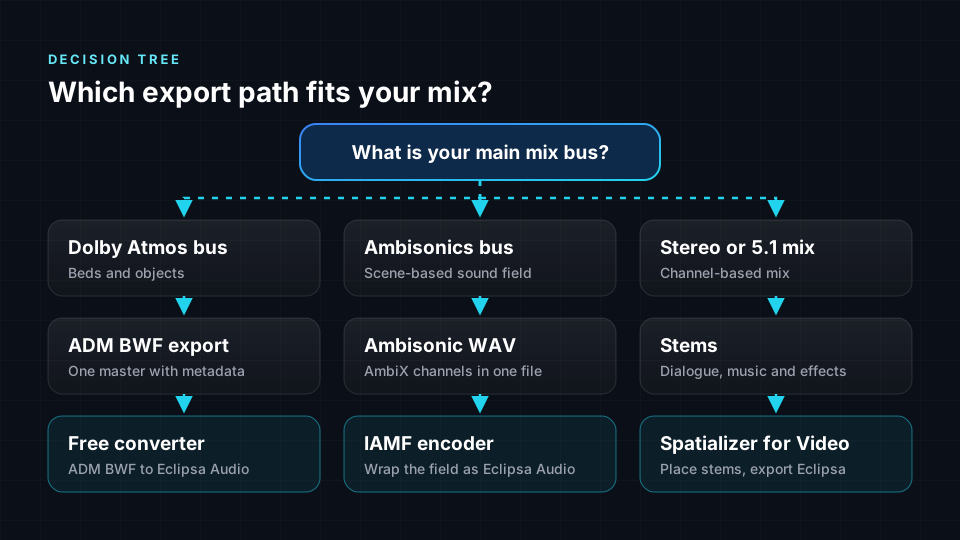
Step 2: choose your export path
What you export depends on the bus you mixed on, not on the destination.
Path A: Dolby Atmos bus to ADM BWF
This is the most direct route. Resolve Studio exports a Dolby Atmos master in two ways:
- From the Fairlight page: Fairlight > Immersive Audio > Export Master, with Format set to Dolby Atmos ADM BWF.
- From the Deliver page: the Audio Only preset, Audio Format Wave, Codec ADM BWF, sample rate as project and 24-bit, with the output track set to the timeline track that holds the master.
The result is a single Broadcast Wave file whose chna and axml chunks describe the beds, objects and their movement. Our guide to the ADM BWF file explains those chunks. Do not open and re-save the file in an editor that does not understand ADM, because that can strip the metadata.
Path B: Ambisonics bus to an ambisonic WAV
Blackmagic's workflow is to bounce the ambisonic bus to a new track (Timeline > Audio > Bounce Mix to Track), then render that track from the Deliver page with the Audio Only preset. You get a multichannel ambisonic WAV, not an ADM file, so the ADM converter is not the right tool. You need an IAMF encoder that accepts a scene-based input, such as the open-source iamf-tools from the Alliance for Open Media. Confirm the channel order and normalization before you encode, because a mismatch puts sounds in the wrong place.
For 360 video, YouTube also has a separate first-order AmbiX route, which is not Eclipsa Audio.
Path C: stereo or 5.1 only
If you do not have Resolve Studio, or the mix is already locked in stereo or 5.1, export clean stems for dialogue, music and effects instead. All stems should share the same start point and length. Those stems are the input for Spatializer for Video (see below). For mix-level tips before you get here, read how to make YouTube videos sound cinematic.
Step 3: convert to Eclipsa Audio
Eclipsa Audio is Google and Samsung's name for audio built on IAMF, the open Immersive Audio Model and Formats specification from the Alliance for Open Media.
For path A, the free ADM to Eclipsa Audio converter runs in your browser with a free Spatial9 account. It reads the beds, objects and movement in the ADM master and rebuilds the mix as a third-order ambisonic scene inside an Eclipsa Audio file. It can also package the result as a YouTube-ready MP4 using your own video file. This is a translation, not a lossless copy: very small, precise objects can sound slightly broader than in the original renderer. Our Atmos to Eclipsa conversion guide covers the limits in more depth.
For path C, Spatializer for Video is Spatial9's tool for building an immersive soundtrack from picture and stems. AI tracks objects on screen and proposes where dialogue, score and effects should sit, and you review the draft. It is in invite-only early access, so plan around the converter if you need to deliver today.
Step 4: render the picture and upload to YouTube
Render the picture from the Deliver page with the stereo mix, using the same in and out points as the audio master, so that the two line up frame for frame. Then combine it with the Eclipsa Audio track, either in the converter's Custom Video option or with your own muxing tool.
YouTube's recommended upload settings list:
| Setting | Recommendation |
|---|---|
| Container | MP4, no edit lists, moov atom at the front |
| Audio codec | AAC-LC, Opus or Eclipsa Audio |
| Channels | Stereo, Stereo + 5.1, or Stereo + Eclipsa Audio |
| Sample rate | 48 kHz |
| Eclipsa Audio bitrate | 128 kbps per channel |
Upload as private or unlisted first. Most viewers hear stereo or a device render, so the stereo mix still matters. Our Eclipsa Audio YouTube guide explains how to confirm which stream is playing.
Check the files before they leave
Before you convert or upload, drop the ADM master and the final MP4 into the free Spatial9 file checker. It runs in your browser and uploads nothing. It plays ADM and surround files in a virtual 7.1.4 room, and lets you A/B an Eclipsa Audio file in stereo and binaural. That is a quick way to catch an export that came out as plain stereo; see is this file really immersive? for the warning signs.
If the same project also needs social cuts and an archive, plan them now: one video, three audio deliverables shows how to print all of them from one locked mix.
Frequently asked questions
Can DaVinci Resolve export Eclipsa Audio directly?
Not according to the documentation we checked. The Fairlight product page, the Resolve 21 feature page and the Resolve 20 Fairlight guide list ADM BWF and IMF IAB as the Dolby Atmos deliverables and do not mention IAMF. Export an ADM master and convert it.
Do I need DaVinci Resolve Studio?
For the Atmos and ambisonic buses, yes. The free version can still export stereo or 5.1 stems, which is path C.
Should I mix on an Atmos bus or an Ambisonics bus?
Use Atmos if you want precise moving objects and a master other services also accept. Use Ambisonics for sound fields and 360 video. For a YouTube Eclipsa upload through the free converter, path A is the shortest.
Will every viewer hear the immersive version?
No. YouTube serves the immersive stream to supported devices and players. Others hear stereo, which is why the stereo mix and the picture render go together.
Sources
- DaVinci Resolve – Fairlight, Blackmagic Design.
- DaVinci Resolve 21 – What's New, Blackmagic Design.
- The Fairlight Audio Guide to DaVinci Resolve 20, Blackmagic Design.
- YouTube recommended upload encoding settings, YouTube Help.
- Use spatial audio in 360-degree and VR videos, YouTube Help.
- Introducing Eclipsa Audio: immersive audio for everyone, Google Open Source Blog.
- Introducing Open Source DAW Plugin for Eclipsa Audio, Google Open Source Blog.
- Immersive Audio Model and Formats (IAMF) specification, Alliance for Open Media.
- ITU-R BS.2076: Audio Definition Model, International Telecommunication Union.
- ITU-R BS.2088: Long-form file format for the international exchange of audio programme materials with metadata, International Telecommunication Union.
From Fairlight to every screen
Mix once in Fairlight, export the ADM master, and the free converter takes it the rest of the way to YouTube. Spatializer for Video, for projects that only have stems, is in early access.
DaVinci Resolve and Fairlight are trademarks of Blackmagic Design. Dolby and Dolby Atmos are trademarks of Dolby Laboratories. Spatial9 is not affiliated with or endorsed by Blackmagic Design or Dolby Laboratories.