CapCut Spatial Audio Workflow: 3D Sound for TikTok, Reels and YouTube
Spatial9 Team · · 9 min read
Key takeaways
- CapCut is an editor, not a spatial mixer: its 3D and 8D audio pages are effect templates, and its documented export is an MP4 with AAC at 44.1 or 48 kHz.
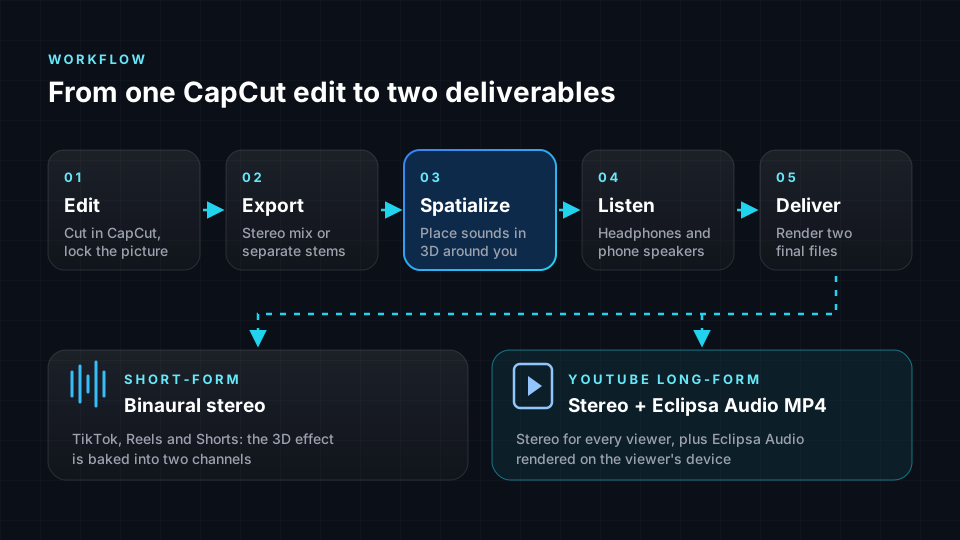
- Lock the edit, then export the full video, an audio-only file or one file per track, all starting at the same frame.
- Spatialize outside CapCut: Spatializer for Video (early access) for finished soundtracks, Spatializer for Music for music beds, or place stems directly.
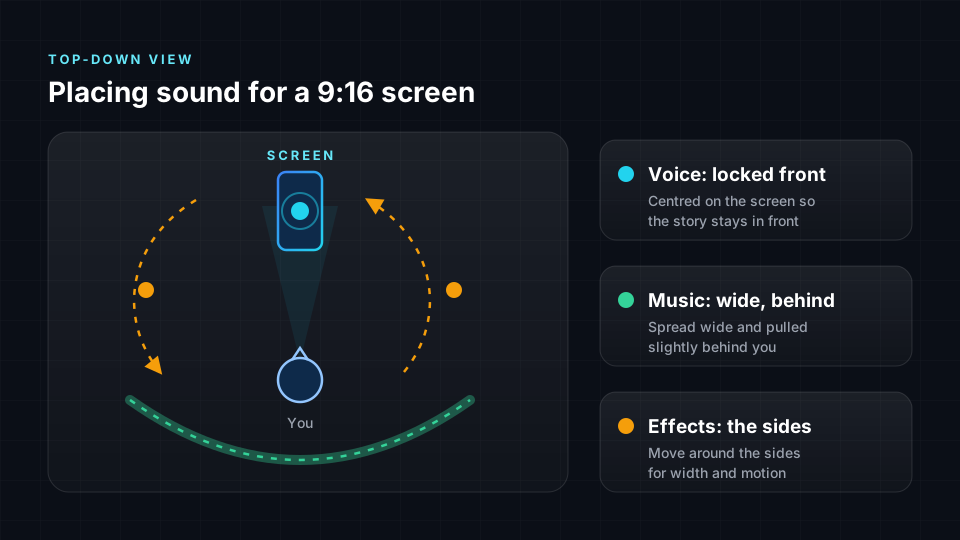
- For vertical video keep the voice front and centre, spread music wide and slightly behind, and move effects only briefly.
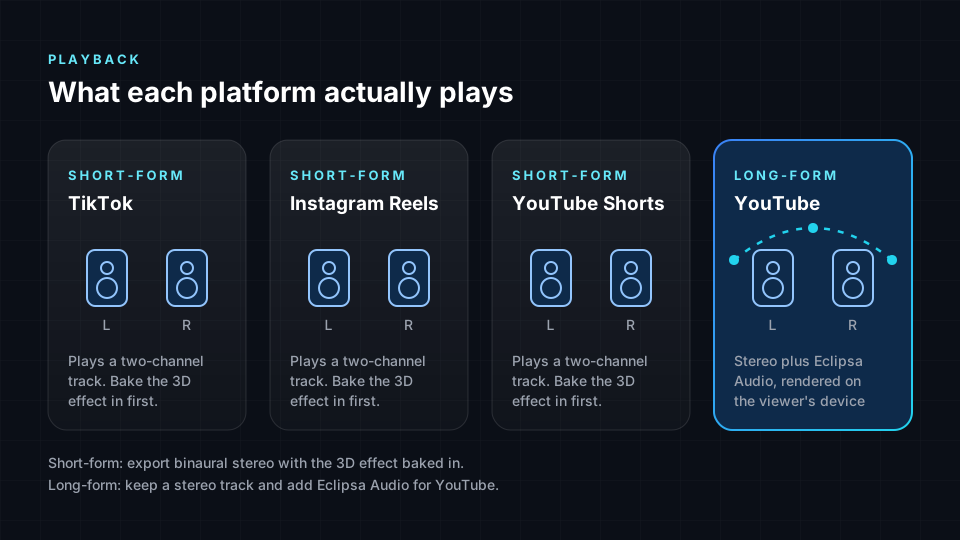
- Deliver binaural stereo to TikTok, Reels and Shorts, and a stereo plus Eclipsa Audio MP4 at 48 kHz to YouTube long-form.
- Remove CapCut 3D or 8D effects before spatializing, and check every file on headphones, a phone speaker and the free in-browser checker.
Many short-form creators cut everything in CapCut, on a phone or on desktop. This guide explains what CapCut can and cannot do for spatial sound, and the realistic paths to a headphone-3D mix that survives upload.
What CapCut actually gives you for audio
Here is what CapCut's own pages document, and what they do not.
| Area | What CapCut documents | What that means for spatial sound |
|---|---|---|
| Video export (desktop) | MP4 with "Export audio" enabled, AAC codec, 44.1 kHz or 48 kHz | A two-channel delivery file. Good for social apps, but it cannot carry a native immersive track |
| Clip audio (mobile) | Each clip has a speaker icon and a Volume control | Mute or isolate clips before exporting, for example to print one track at a time |
| "3D audio" and "8D audio" | Explore pages with effect templates marketed as immersive or surround | Creative stereo effects, mostly panning and space. Not a binaural renderer and not a format |
| Voice effects and sound effects | Libraries of voice changers and sound effects | Useful raw material, but no 3D position for each sound |
| Immersive export | We found no help page for multichannel, Dolby Atmos or Eclipsa Audio export | Any immersive version has to be made outside CapCut |
CapCut describes its "3D" pages as AI effect templates with an immersive, surround-like feel. That is an effect on the whole track, close to what is usually called 8D audio. Real spatial audio places each sound on its own. If the terms are new to you, read binaural vs spatial audio first.
Why the 3D step happens outside CapCut
A convincing headphone mix needs three things a template cannot supply:
- Separate sources. Voice, music and effects each need their own position. A finished stereo mix has them blended together.
- A binaural render. Headphone 3D depends on the timing and tone cues of a human head, applied per source. Panning alone gives left and right, not front, back or height.
- A speaker check. Most short-form viewing happens on phone speakers. A mix that only works on headphones loses most of your audience. See spatial audio on headphones vs phone speakers.
So use CapCut for picture, timing and rough levels, and a dedicated spatial step for the sound.
Step 1: get the audio out of CapCut
Lock the edit first. Every change after the spatial pass moves sound out of sync, and you will have to do it again. Then choose one of three export routes.
Route A: export the full video
The simplest route, on every CapCut platform. CapCut's help says to choose MP4 on desktop, enable "Export audio" and pick AAC at 44.1 or 48 kHz. Prefer 48 kHz, the rate YouTube recommends. Separating voice from music then happens in the spatial step.
Route B: export audio only
Third-party guides describe an audio export option in the export dialog on recent desktop builds, with a choice of formats. We could not confirm the exact options on CapCut's own help pages. If your build has it, choose WAV over MP3 or AAC, so you do not lose quality before spatializing.
Route C: print one file per track (stems)
This gives the cleanest result. Keep voice, music and sound effects on their own tracks in the timeline. Mute everything except one group, export, and repeat for each group. Every file must start at the same frame and have the same length. That way they line up again after spatializing.
Step 2: spatialize
What you use depends on what you exported.
- A full video or a finished mix: Spatial9's Spatializer for Video is in early access. It is meant for the case where you only have the finished soundtrack.
- A music bed on its own: Spatializer for Music handles songs and instrumentals. Use it when the music is a separate file, then add the voice back in front.
- Stems: with separate voice, music and effects files, you control the placement directly, and no separation step is needed.
Whatever the tool, the placement rules for vertical video are the same.
Placement rules for a 9:16 clip
- Keep the voice in front and centred. The face is on screen, so the voice belongs there. A voice that drifts to the side is the fastest way to make a clip feel wrong.
- Spread the music bed wide and slightly behind. This makes room for the voice and gives the mix its sense of space.
- Move effects briefly. A whoosh across a transition works. Constant movement gets tiring and is lost on a phone speaker.
- Do not spatialize twice. If you used a CapCut "3D" or "8D" template, remove it before the spatial pass. Stacking a stereo effect on top of a binaural render smears the image. Our guide on double spatial processing explains why.
Step 3: build the deliverables
Short-form: a binaural stereo file
We found no immersive upload option documented for TikTok, Instagram Reels or YouTube Shorts. Plan for a two-channel track. For these apps, the spatial version is a binaural stereo render, with the 3D cues baked into the left and right channels. In practice:
- Put the binaural audio back on the final picture as an MP4 with AAC at 48 kHz. You can bring it back into CapCut as a new audio track, with the original muted, or mux it with a separate tool.
- Check it on a phone speaker as well as headphones. If the voice gets thin or distant on the speaker, the render is too extreme for a feed.
- Say "headphones on" in the caption or on screen.
YouTube long-form: stereo plus Eclipsa Audio
YouTube's recommended upload settings list Eclipsa Audio as an audio codec, with the channel option "Stereo + Eclipsa Audio", at 48 kHz, in an MP4 with no edit lists and the moov atom at the front. YouTube recommends 128 kbps per channel for Eclipsa Audio. Eclipsa Audio is built on IAMF, the Immersive Audio Model and Formats specification from the Alliance for Open Media. The immersive track is rendered on the viewer's device, for headphones or speakers, and the stereo track is the fallback.
This route needs an immersive master, not the binaural file. If you have an ADM master, the free ADM to Eclipsa converter turns it into Eclipsa Audio. Our Eclipsa Audio YouTube guide covers packaging and checking the upload, and one video, three audio deliverables shows how to plan all versions from one session.
| Deliverable | Audio | Where it goes | Main check |
|---|---|---|---|
| Binaural stereo MP4 | Two channels, AAC, 48 kHz | TikTok, Reels, Shorts | Works on headphones and still clear on a phone speaker |
| Stereo plus Eclipsa Audio MP4 | Stereo track plus IAMF immersive track, 48 kHz | YouTube long-form | Both tracks present after processing |
| Archive | Stems, binaural print, immersive master, notes | Your drive | Same start and length for every file |
Step 4: check before you post
- Sync. Play the first and last seconds and any hard cut. Spatial processing must not shift timing.
- Level. A binaural render can change perceived loudness. Match it by ear against your original stereo export.
- Speaker check. Play it once on the phone itself. Voice clarity matters more than width.
- Files. Run each deliverable through the free in-browser file checker. It reads channel count, sample rate and duration on your own device and uploads nothing.
- After upload. CapCut's help notes that silent audio after posting to TikTok is usually caused by copyright enforcement, not the export. Use music you have the rights to.
FAQ
Does CapCut have spatial audio?
Not in the sense of a 3D mixer. CapCut offers "3D audio" and "8D audio" effect templates and a large library of sound and voice effects. We found no documentation of a binaural renderer for each sound, or of a multichannel or Eclipsa Audio export.
Is CapCut's 8D audio the same as binaural audio?
No. 8D is a stereo effect that moves the whole track around your head. Binaural audio is a headphone rendering with the cues of a human head, and each sound can have its own place.
Can I upload Eclipsa Audio to TikTok or Instagram?
We found no immersive upload option documented by either app. Use a binaural stereo version for them, and keep Eclipsa Audio for YouTube long-form.
Should I export WAV or AAC from CapCut for spatializing?
Use WAV if your build offers it, otherwise AAC at 48 kHz. Use AAC for the final short-form MP4, as CapCut's own help recommends.
Will the 3D effect work on phone speakers?
Mostly not. Phone speakers are too close together to reproduce binaural cues, so keep the voice centred and clear.
Sources
- Why Is There No Sound After the Video Is Published to TikTok?, CapCut Help.
- Free 3D Audio Templates for Immersive Video, CapCut.
- 3D Sound Effect Templates, CapCut.
- Free Voice Effects Online, CapCut.
- YouTube recommended upload encoding settings, YouTube Help.
- Use spatial audio in 360-degree and VR videos, YouTube Help.
- What is IAMF?, Alliance for Open Media.
- Immersive Audio Model and Formats (IAMF) specification, Alliance for Open Media.
- Introducing Eclipsa Audio: immersive audio for everyone, Google Open Source Blog.
Keep CapCut, add the third dimension
Cut in CapCut, give the sound a dedicated spatial pass, and send each platform the version it can play. Spatializer for Video is in early access, and Spatializer for Music handles your music beds.
CapCut and TikTok are trademarks of their respective owners. Spatial9 is not affiliated with or endorsed by CapCut, ByteDance, TikTok, Meta or Google.